Unity 3D: Flappy Bird AI With Machine Learning

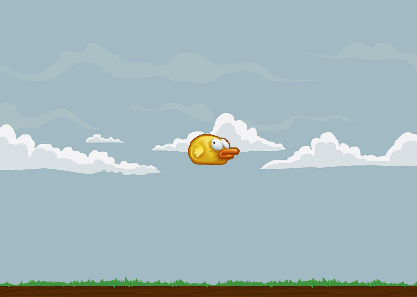
Machine Learning concepts can be used as powerful tools by game developers to create NPC behaviours, help balance game mechanics or automate quality assurance. In 2017, Unity released the ML-Agents Plugin to help developers integrate Machine Learning into their game. I gave it a try by making an AI that taught itself how to play a Flappy Bird kind of game using neural networks and reinforcement learning. It turned out pretty great so here's a summary of my implementation.

The Unity ML-Agents Plugin provides tools for several Machine Learning methods: reinforcement learning, imitation learning and neuroevolution. This time, I went with reinforcement learning. Birds (or learning agents) are subject to a training session where inputs (or observations) are processed through a neural network that will output the user action, which in this case, is to flap the bird's wing to jump up. Outputs are calculated by the neural network based on reward points given to the agent depending on if it did something good. The ML-Agents Plugin works with the Tensorflow Machine Learning Library to generate the neural network during the training session. In short, all we need to do is to feed the observations, manage the output actions and give reward points if the bird agent is in a good position or remove some if it dies by hitting an obstacle.

FlappyML2.gif

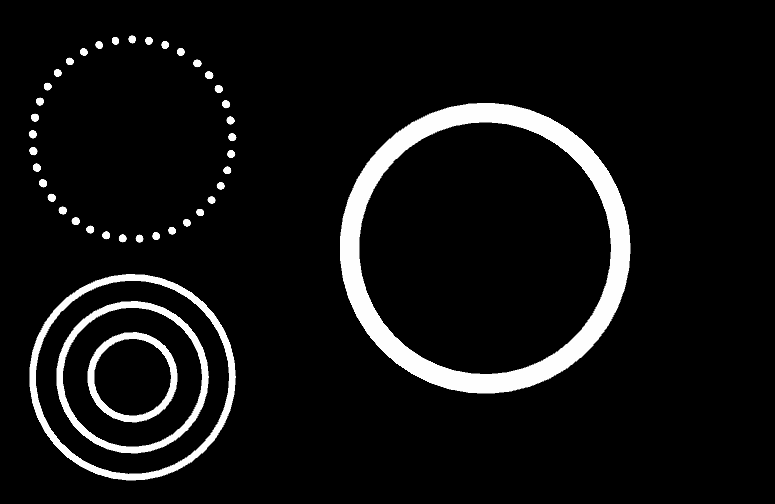
A visualization of the bird agent neural network. The hidden layer is generated and its goal is to transform the inputs into the outputs.

Observations (Inputs)

  1. Distance between bird and top or the screen. This distance is normalized between 0 and 1 by being divided by the distance between the floor and the ceiling.
  2. Distance between bird and floor, normalized just like the previous observation.
  3. Bird's RigidBody vertical velocity normalized between 0 and 1 by being divided by the bird's max Y speed.
  4. Y difference between the bird and the center position of the next obstacle's opening, normalized between -1 and 1.

Observations are normalized between -1 and 1 so that all the values inputed to the neural network are processed on the same scale.

Actions (Continuous Outputs)

  1. Flap wings action. A normalized value between 0 and 1 is outputed by the neural network. Bird only jumps if that value is greater than 1/2.

Reinforcement Learning Rewards

  • The bird agent gains 0.1 reward point each decision interval if its current vertical velocity is heading toward the center of the next obstacle's opening.
  • The bird agent loses 1 reward point and is reseted as soon as it hits any obstacles, the top of the screen or the floor.

Learning Process

The bird agent is set to take a decision every 5 frames, so it decides if it should jump or not at this decision frequency. Before the training session, we can set for how long we want the agents to train, measured in decision step count. If the observations, the actions and the rewards are well made, the longer it trains, the better the results will be. On the other hand, over training agents could make them seem mechanical in their action and less flexible to new situations. For this project, I tested different learning session durations. After a 50k decision steps training session, birds were averaging a score of 10 obstacles and often failed to overcome obstacles if the gap from the previous obstacle was tall. A 200k decision steps session made the birds a lot better but few were able to go further than 100 obstacles. Finally, after a 1 million decision steps training session, birds can go on for almost forever, only very rarely failing. Note that the training process will be a lot faster if you have multiple learning agents simultaneously learning on your scene. For this project, I trained with 15 bird agents at the same time.


Sources

Unity Plugin source and documentation - Unity ML-Agents Plugin
Environment and Tensorflow Setup
    - Setting Up Tensorflow For Use With Unity
    - Unity3D Machine Learning Setup for ML-Agents on Windows 10 with Tensorflow
Sprite Assets - Unity for 2D Live Session: Making A Flapping Bird Style Game

Unity3D: 12 Ways to Save Texture Memory in 2D Games

When developing a 2D game, it can quickly hit the roof in term of memory usage, especially when targeting mobile devices. A game using too much memory will drain the battery down or simply crash if it exceeds the maximum allowed by the OS. Here are a few basic tricks worth mastering when you first start creating or optimizing 2D games in Unity. Make sure to go over these tips with artists as well because a lot of these are related to their work.

1 - Use atlases. Place Sprites that are related in the same atlas. Unity will create a single Texture with all these Sprites together which optimizes memory usage in a completely transparent way to developer. Documentation: https://docs.unity3d.com/Manual/SpriteAtlas.html

2 - Use tiles. For instance, if you have a grass background for a top-down view game, instead of having a huge grass texture to cover the whole screen, have a small tileable Sprite that will repeat itself all over the scene. Documentation: https://docs.unity3d.com/ScriptReference/SpriteDrawMode.html

tile.png

3 - Use the 9-slice technic to create Sprites that stretch their center rectangle to any size as in the example below. Documentation: https://docs.unity3d.com/Manual/9SliceSprites.html

9slice.png


4 - If you have a Sprite that comes in multiple color variations, instead of exporting multiple versions of the same Sprite, export a single one in grayscale and use the Color property of the SpriteRenderer to reproduce your color variations. Note that you might have to divide and export your object in multiple Sprites to color the different parts of the object independently.

5 - Stretch a small 1x1 white pixel Sprite to reproduce plain color rectangles in your scene instead of having a huge Sprite that's only a plain colored rectangle. Use the Color property of the SpriteRenderer to color rectangles created that way.

6 - Use Unity's basic vector sprite shapes. Shapes available are squares, triangles, diamonds, hexagons, circles and polygons. They are extremely lightweight memory wise and can be stretched to any size since they are vector graphics.

7 - Load Sprites dynamically from Resources for things you have a lot of. For example, pictures of animal in a huge catalog of animals. That way, Sprites are only loaded when needed instead of beeing loaded in memory all together at the start of the game. Warning: Don't put textures that are in resources folder in atlases as they will be duplicated in your build. Documentation: https://docs.unity3d.com/ScriptReference/Resources.Load.html

ResourceLoad.gif

8 - Limit the use of textures bigger than 1024x1024 because they can use up to 10mb or more in memory. Be creative and export your Sprites into smaller parts when possible.

huge.png

9 - Use Unity Texture compression when it doesn't affect the resulting quality. Test with difference Compression qualities and you can also try to reduce the Max Size and see if your scene becomes too ugly or not.

10 - Export your Sprite in power of two dimensions. Make sure all textures not in an atlas have a dimensions that is a power of two to improve compression results.

PowerOfTwo.png

11 - When making vertical or horizontal gradient Sprites, make them 1 pixel thin and stretch them as needed on the scene to reproduce the exact same effect at a tiny fraction of the memory cost.

thin.png

12 - After a build, take a look at the report to get a list of the assets sorted by memory usage. Go down the list and try to cut the fat by using previous technics shown in this blog post!

Unity3D : Turn Sprites Into Cardboard

At the last game jam, a team made a game where scenery elements were cardboard cutouts. I thought it would be really cool to have a script in Unity that would add a cardboard border around any sprite on the scene. Here are some games that have cardboard aestetics.

At first, I tried to use Unity's LineRenderer component to simply add tickness to the perimeter of the sprite but that didn't work out since Line Renderers are designed to always face the same direction, to display a billboard line that always face the camera, for instance. The remaining solution was to procedurally generate a mesh a round the sprite perimeter. This perimeter is defined by the points on a PolygonCollider2D component since it automatically generate the points around a sprite. This way, I didn't have to engineer that part myself. Here's the result.

Capture.PNG

Setup instructions

  1. Download the Cardboarder.cs script and add it into your Unity project.
  2. Add a SpriteRenderer to an object on the scene.
  3. Add the PolygonCollider2D component to the SpriteRenderer object. It will automatically shape itself around the sprite.
  4. Add the Cardboarder script component.
  5. Fill out the Materials on the Cardboarder component. The Cardboard Line Material should be a material with the cardboard texture (don't forget to set the wrap mode of that texture to Repeat in the import settings). The Cardboard Face Material should be a simple material that supports a solid color.
  6. Tweak the other parameters on the component as needed.
Texture used for the cardboard perimeter

Texture used for the cardboard perimeter

Room for improvement

  • Since these are based on SpriteRenderer components, Unity cannot cast or receive shadow from these. The Cardboarder script could turn the SpriteRenderer into a mesh or allow the use of Quad Mesh as source.
  • The Sprite perimeter is based on the shape of the PolygonCollider2D. That means you cannot make a folded cardboard. It would be useful to design a Unity Editor tool to create custom 3D shapes like the tree in the above Paper Mario: Color Splash screenshot.


Ideas To Try Out To [Maybe] Win A Game Jam

Winning a game jam might seems a bit tricky and random since every team usually make so many different and fun games that it's hard for the judges to evaluate them all together and pick a single winner. But if you have a strategy to make yourself stand from the crowd,  you might very well find yourself winning the jam. Here are a few ideas and tips to consider that could help you accomplish that.

  • Be artsy. Add visual effects, meditative audio or abstract gameplay. Anything that will surprise the player and set you apart from the other teams.
  • Be original. Don't make a Mario Party like arena games. Those are really fun to play but half of the teams will do somehting like that.
  • Get physical. Use physic based gameplay for unpredicable fun.
  • Have special hardware. Consider making a game with a non traditionnal controller.
  • Go online. Local multiplayer games often make fun game jam games. Why not bring that one step further with an online multiplayer game and impress people with your technical skills?
  • Have multi-layered gameplay. For multiplayer games, consider an asynchronous gameplay where players have totally different gameplay and must work together to solve a common goal.
  • Polish that UI. Find a nice font for your texts, have an intro scene that re-uses assets from the game.
  • Make a complete experience. Have a simple tutorial at the start and add a game over or success screen with a score, a retry button and an exit button.
  • Make it explode. Add simple but impactful visual effects such as particles, trail renderers and camera shake to quickly make the game look a lot more polished.
  • Use your voice. Record yourself for dialog lines and mouth-made sound effects or ask that one guy who is really good at it to help you out.
  • Prepare your game for the demo. Add hidden shortcuts to reach that cool ending sequence you made in case the player can't reach it.
  • Act. Disguise yourself and make an act while presenting your game to the jury and the crowd. This will add a lot to the experience and impress the judges.
  • Twist the theme. Even if your game doesn't directly fit the theme, prepare a line or two on how the gameplay is a metaphor and how it really fits the theme after all.

Unity3D: Cache Component References Instead of calling GetComponent()?

You may have heard that you should always cache your transform, gameObject and script component if you plan to access them in your class because this.transform, this.gameObject and this.GetComponent() are slow. But does it really make a difference?

Instead of doing :

void Start()
{
   transform.Translate(1, 0, 0);
}

Should we do the following?

public Transform CachedTransform;
void Start()
{
   CachedTransform.Translate(1, 0, 0);
}

And what about gameObject access and Script Component access with the GetComponent() Method? Let's take a look at some tests. For transform, gameObject and Script Component, we have looped 10 000 000 times on them, once uncached and once with a cached reference. These operations where called from the Start() method and time was measured with System.Diagnostics.Stopwatch.

Accessing Transform (average time in seconds)

Accesing GameObject (average time in seconds)

That doesn't seem too bad. Let's look at GetComponent() now.

Accessing a Script Component (average time in seconds)

As for this.gameObject and this.transform, Unity seems to have some kind of caching behind the scene as the performance difference is not as bad as GetComponent(). However, it looks like GetComponent() is 20 times slower than accessing a cached reference of the Script Component.

Does this mean you should always cache references into a variable? Not necessarily. 10 000 000 GetComponent() calls took 2 seconds, so even if you call it 1000 time per frame, it takes 0.0002 seconds, which is 0.2 milliseconds. Considering a frame at 60 FPS is 16 milliseconds, 0.2 milliseconds is not nothing.

Maybe if you do things in Update(), you should cache references, otherwise, it's not that bad to access it with GetComponent(). As for Transform and GameObject accessing, the caching performance gain is much slimmer. Because of that, the guideline could be to cache Script Component references to avoid GetComponent() and keep using this.transform and this.gameObject because it's simplier. On the other hand, always caching your references doesn't take that much more efforts and optimizes your code from the start.

Simple 3D Art Styles for Programmers

If you are a programmer and want nice 3D assets for you game, creating them yourself might be easier than you think. Using a 3D modeling software such as Blender, you could quickly learn to make simple but visually attractive things. It just takes a little time to get used to modeling mechanics and some great references to look up to. With that in mind, here's a list of game from which you can draw some inspiration from.

Render a Circular Perimeter in Unity3D

If you want to make a circle perimeter line in Unity3D to display under a selected character, for example, you may come across some issues if you use a simple texture like the green circle below. If the circle has to support different size for different sizes of characters, the line will be bolder for larger character. That's why I came up with a simple solution for this.

Using a simple circle texture like this may not be the perfect solution.

Using a simple circle texture like this may not be the perfect solution.

CircleLineRenderer.cs (full code at the end of this post) is a simple script that uses a Line Renderer to draw a circle with the specified width. This way, the line is always the same width even when it is animated to different radius.

You can adjust the radius of the perimeter, the width of the line and if it's a dotted line using the property fields on the component in the inspector or by calling the SetRadius(), SetWidth() or SetIsDotted() methods at runtime. The LineRenderer renders in local space so you can rotate the Transform to change the plane of the circle.

You also have to assign a material for the plain line field and another one for the dotted line type, if you want to us it. Here's a texture for the dotted line material, note that it has to be a circle with empty padding space so the tiling material alternates between a dot an empty space.

This solution based on a Line Renderer might not be what you need if you have a bumpy terrain because it will clip through it. In that case, you may want to use a projector to make the texture fit the curve of the terrain perfectly.


CircleLineRenderer.cs

(to use with Unity 5.5 or newer since the LineRenderer component changed in 5.5)

using UnityEngine;

[RequireComponent(typeof(LineRenderer))]
public class CircleLineRenderer : MonoBehaviour {

    private const float DOTTED_LINE_TICKNESS_RATIO = 2.5f;
    private const int NUM_CAP_VERTICES = 6;

    [Tooltip("The radius of the circle perimeter")]
    public float radius = 2;

    [Tooltip("The width of the line for the circle perimeter")]
    public float lineWidth = 0.05f;

    [Tooltip("Check this to use the dotted line material for the circle perimeter line")]
    public bool isDotted = false;

    [Tooltip("The material for the plain line")]
    public Material plainMaterial;

    [Tooltip("The material for the dotted line")]
    public Material dottedMaterial;

    private LineRenderer lineRenderer;

    void Start ()
    {
        lineRenderer = GetComponent<LineRenderer>();
        lineRenderer.useWorldSpace = false;
        lineRenderer.numCapVertices = NUM_CAP_VERTICES;
        SetRadius(radius);
    }
    
    void Update ()
    {
        //While testing in-editor, refresh the circle each frame so we can test the circle by changing the fields in the inspector.
        if (Application.isEditor) SetRadius(radius);
    }

    //Call this method from other scripts to adjust the radius at runtime
    public void SetRadius(float pRadius)
    {
        radius = pRadius;

        if (radius <= 0.1f)
        {
            lineRenderer.numPositions = 0;
            return;
        }

        float tickness = lineWidth;
        if(isDotted) tickness *= DOTTED_LINE_TICKNESS_RATIO;
        lineRenderer.startWidth = tickness;
        lineRenderer.endWidth = tickness;

        //Calculate the number of vertices needed depending on radius so it always looks round.
        //For instance, huge circles need proportionaly less vertices than smaller ones to look good.
        //Source : http://stackoverflow.com/questions/11774038/how-to-render-a-circle-with-as-few-vertices-as-possible
        float e = 0.01f; //constant ratio to adjust, reduce this value for more vertices
        float th = Mathf.Acos(2 * Mathf.Pow(1 - e / radius, 2) - 1); //th is in radian
        int numberOfVertices = Mathf.CeilToInt(2 * Mathf.PI / th);

        lineRenderer.numPositions = numberOfVertices + 1;
        for (int i = 0; i < numberOfVertices + 1; i++)
        {
            float angle = (360f / (float)numberOfVertices) * (float)i;
            lineRenderer.SetPosition(i, radius * new Vector3(Mathf.Cos(Mathf.Deg2Rad * angle), Mathf.Sin(Mathf.Deg2Rad * angle), 0));
        }

        //Update material depending if it's a dotted line or a plain one.
        if (isDotted)
        {
            lineRenderer.material = dottedMaterial;
            lineRenderer.materials[0].mainTextureScale = new Vector3(2 * Mathf.PI * radius * (1 / tickness), 1, 1);
        }
        else
        {
            lineRenderer.material = plainMaterial;
            lineRenderer.materials[0].mainTextureScale = Vector3.one;
        }
    }

    //Call this method from other scripts to adjust the width of the line at runtime
    public void SetWidth(float pWidth)
    {
        lineWidth = pWidth;
        SetRadius(radius);
    }

    //Call this method from other scripts to switch between plain and dotted line at runtime
    public void SetIsDotted(bool pIsDotted)
    {
        if (isDotted != pIsDotted)
        {
            isDotted = pIsDotted;
            SetRadius(radius);
        }
    }    
}

10 Interview Questions for Unity3D

1 - What is a Coroutine?

A coroutine is like a function that has the ability to pause execution and return control to Unity but then to continue where it left off on the following frame. It is useful to make procedural animations or a sequence of events over time.

Source : https://docs.unity3d.com/Manual/Coroutines.html

2 - What is a shader?

Shaders are small scripts that contain the mathematical calculations and algorithms for calculating the colour of each pixel rendered, based on the lighting input and the Material configuration.

Source : https://docs.unity3d.com/Manual/Shaders.html

3 - What is the difference between the Start, Awake and OnEnable methods?

Start is called on the frame when a script is enabled just before any of the Update methods is called the first time. Awake is called when the script instance is being loaded. OnEnable is called when the object becomes enabled and active. Execution order is : Awake, OnEnable, Start.

Source : https://docs.unity3d.com/ScriptReference/MonoBehaviour.Start.html

Source : https://docs.unity3d.com/ScriptReference/MonoBehaviour.Awake.html

Source : https://docs.unity3d.com/ScriptReference/MonoBehaviour.OnEnable.html

Source : http://answers.unity3d.com/questions/217941/onenable-awake-start-order.html

4 - In the mock-up below, pin down every elements to be cut into sprites to recreate a scene Into Unity. The goal is to optimize draw calls and memory usage.

  • The Sky can be cut as a one pixel wide sprite and be put on a Transform with a stretched X scale
  • The moutains can be cut as a single sprite
  • Only the largest palm tree should be cut as the others are just scaled down, rotated and mirrored duplicates
  • The circles for the sun and it's shadow can be created in Unity. Right-click in the project hierarchy, Create, Sprites, Circle. This creates a Vector shape so it can be scaled to any size without using too much memory. You can color the sprite using the Color property of the SpriteRenderer
  • Use the same technic as the sun to create a square that will fill most of the scene with a plain sand color.
  • Cut a sprite for the darker sand
  • For the frog Bubble, use the Sprite Editor to achieve the nine slice technic
  • The arrow at the bottom of the bubble is a single sprite
  • A single frog can be cut in white and gray and can be duplicated and colored differently using the Color property of the Sprite Renderer
  • The eyes, mouth and waterlily have to be cut as seperated sprites since they are not colored like the rest of the frog's body

Source for slicing a sprite : https://www.youtube.com/watch?v=WFQcc1GUe7U

5 - What can be modified in the code below to improve it?

  • Don't use GameObject.Find, especially not inside the update because it's slow
  • Limit the use of tags, search object by components instead when possible because maintaining tags can cause problems if a tag name changes
  • Instead of looking for objects every frame (it's slow), cache the list of EnnemyController inside the class and use a Delegate to know when an ennemy dies so this class can maintain the list of ennemies alive and call the Victory method when all ennemies are dead
void Update()
{
     GameObject[] objects = GameObject.FindGameObjectsWithTag("Ennemy");
     if (objects.Length == 0) Victory();
     else foreach (GameObject obj in objects) obj.GetComponent<EnnemyController>().DoAction();
}

6 - Describe a way to create a mini-map in the corner of a screen to display in real time the surroundings or the player.

Use a RenderTexture (Right-click in the project hierarchy, Create, Render Texture) to render a special, top down view, mini-map camera inside this texture. Bind this texture to a UI Image component. You can also add an icon over the head of you character that will be on a layer only rendered by the mini-map camera.

Source : https://docs.unity3d.com/ScriptReference/RenderTexture.html

7 - There is an instance of a prefab on the scene A and another instance of the same prefab on the scene B. We modify the "Speed" field of the prefab in the scene B to 385 and then we change the same field of the prefab in the scene A to 500 before hitting the Apply button on the prefab in the scene A. What's the value of the "Speed" field : on the prefab, on the prefab instance in the scene A and on the prefab isntance in the scene B?

Prefab : 500

Scene A prefab instance : 500

Scene B prefab instance : 385

Source : https://docs.unity3d.com/Manual/Prefabs.html

8 - A piece of code inside the Update method makes a UI panel slide in the scene using transform.Translate(1, 0, 0). On a first generation iPad, the panel takes 2 seconds to animate to the center of the screen while it only takes 1 second on an newer iPad. Why does this happen and how can we fix it?

Devices running on different specs can have different framerates. In this case, maybe the game is running at 30 fps on the older iPad and running at 60 fps on the newer one. Update is called once per frame so that's why the animation complete faster on the newer iPad. To make the translation move at a constant speed, multiply the translation values by Time.deltaTime which is the time since the last frame. Another option would be to execute the code inside the FixedUpdate method which always run at a fixed interval of time.

Source : https://docs.unity3d.com/ScriptReference/Time-deltaTime.html

Source : https://docs.unity3d.com/ScriptReference/MonoBehaviour.FixedUpdate.html

9 - In a 2D platformer game, the character is a GameObject moved by physics with a RigidBody2D and a BoxCollider2D. On the scene, there are coins made of a Sprite and a CircleCollider2D with the IsTrigger parameter activated. In the caracter script, we want to increment the score by one when the coin is collided. But, the code below is never reached when the character runs into a coin. Why?

OnTriggerEnter is a Unity method that works with 3D physics and RigidBody components. For 2D physics and RigidBody2D components, we use the OnTriggerEnter2D method.

Source : https://docs.unity3d.com/ScriptReference/MonoBehaviour.OnTriggerEnter2D.html

void OnTriggerEnter(Collider collider)
{
     Score += 1;
}

10 - Give an example of things we could do inside another Thread beside the Unity main Thread.

You can do anything in other Threads except using Unity API methods themselves across different threads, as they are not thread-safe.

Source : http://answers.unity3d.com/questions/908054/unity-5-multithreading.html

Multi Touch Input Manager in Unity3D

In Unity3D, it's really easy to do something when the user clicks on an object. Just add a script to that object defining a method named OnMouseDown() and add your behaviour to it. However, if you want your game to support multi touch on mobile devices or other type of devices with a touch screen, Unity doesn't provide methods like OnMouseDown() but for touches. You have to manually loop through Input.touches and check their states which can quickly become a burden if you have different kind of objects with different behaviour.

That's why I made the MultiTouchInputManager class which manage the user's touch events and transfer them to the appropriate detected object under the user's touch. The object, which inherit from an abstract MultiTouchObject class can then easily implements the TouchDown, TouchPressed and TouchUp events to easily make custom behaviours like drag and drop.

The MultiTouchInputManager also works in pair with the MultiTouchCameraDrag script which allows panning and pinch-zooming of an orthographic camera. That, along with physic or non-physical dragable objects classes which inherit from MultiTouchObject, makes a great starter pack for any 2D multi touch enabled projects.

How to use the MultiTouchInputManager:

  1. Add the MultiTouchInputManager script component to the Camera object or on an empty object.
  2. Add objects on your scene with scripts that inherit from MultiTouchObject. The Sample project already includes the MultiTouchDraggableObject (non physic drag and drop) and the MultiTouchPhysic2DDraggableObject (drag and drop by physical forces). You can use them directly or inherit from them for custom drag and drop behaviours.
  3. Adjust touch priority field of your objects to establish which object will have priority if multiple objects are overlapping under the user's touch.

Sample project download link : MultiTouchInputManager

Objet Pooling in Unity3D

When you have lots of prefabs creation and destruction going on at runtime in Unity3D, things can get laggy. Or at least, it's inneficient! That's where a pooling system comes in handy. Object pooling means to recycle objects to avoid the performance drop. Concretely, it means to deactivate objects instead of destroying them when they have achieved their purpose and when you want to create a new instance of an object, you check if a disabled version of it is available to be recycled.

So I've made a simple C# script called PoolingManager.cs that does the job for you.

To use it, create a new empty object in the scene hierarchy and attach the PoolingManager script to it. Once this is done, simply call the Provide function of the PoolingManager singleton from anywhere in your code like so :

GameObject newObject = PoolingManager.Instance.Provide(myPrefab); //Initialize newObject and do other stuffs here

The Provide(Transform pPrefab) method will look if a unused(disabled) object of that same prefab name exists in the scene and if not, it will instanciate a new object with that prefab. The only thing you have to take care is to disable objects instead of destroying so the PoolingManager can reuse them. Also, if you have a script attached to your prefab and it does things in the Start() method, transfer these things in the OnEnable() method so the code you want to run when an object appears will happen even if it's a recycled instance. If everything goes well, your scene should look like this while playing :

When the player dies and you want to reset the level, you can simply call PoolingManager.Instance.DeactivateAllObjects() to disable all instancied objects at once, making them available for use again.

Download linkPoolingManager.cs